Tuesday, September 5, 2017

Countdown to Confetti - Nuts About You, Monsterous & Christmas Bear

Are you ready for some major cuteness! Today is the start of the Reverse Confetti Countdown for the September release and you are going to love all the new products Jen is releasing this month!  

Today we are giving you a sneak of three new stamps sets along with the coordinating Confetti Cuts and you may see some other new products in my projects today!!!    We will be sharing sneak peeks with you this week - September 5th, 6th and 7th.   All the new products will be available to purchase in the Reverse Confetti Shop on September 8th and there will be a blog hop that day as well!   Make sure to check back in with me each day - I have loads of projects to share with you.    


Let's get started,  I made two cards today with the Nuts About You stamp set!    For the first card, I created a scene using the new hill die that is included in the Nuts About You stamp set!   That is right! There is a border die that is included!    The pattern in the background of my card was created with the new Leaf Lattice Cover Panel cut with cardstock that I used as a stencil.


 I ink blended on Bristol card stock with some light blue ink.    I stamped and colored my images with Copic Markers and then die cut them with the Nuts About You Confetti Cuts.    I die cut the grassy hill border from some Lime Green cardstock and stamped with a sentiment from the Nuts About You stamp set.    I added some hemp twine to the top and added a cream felt flower cut using the Berry Sweet Confetti Cuts and added a white sequin.   


For my second card, I created another scene but this time I used the new Fa La La Circle to cut a pinked edge tag from Premier Polar White cardstock and added a grassy border with Stone cardstock.  


I colored my images using the colors from the beautiful new 6x6 patterned paper pack called Every Little Bit and then die cut with the Nuts About You Confetti Cuts.    The new paper pad has some gorgeous papers in this collection that you are going to love!
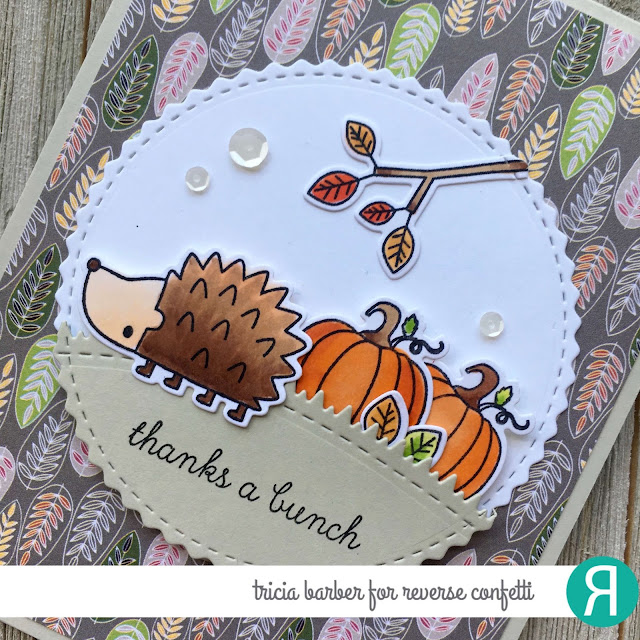

 I layered my card panel on a Stone cardstock base and added some sequins.   The sentiment is also from the Nuts About You stamp set.


I made a little treat bag to go with my card.  I colored my images from Nuts About You on kraft to match the bag and added some of the same Every Little Bit patterned paper on the Bitty Window Bag that Reverse Confetti has released with the September release.    This is such a cute little bag and they are lined and will close securely.   I just added the clothes pin as a decorative touch.    The small tag is from the Box Wrap Confetti Cut.


Next up, I have two more projects to share that I made with the Monsterous stamp set!   For the card, I stamped and heat embossed the images from Monsterous onto Bristol cardstock and sponged with several Reverse Confetti inks:  Wisteria/Sunshine, Mint/Parakeet, and Salsa/Piggy Bank.    I die cut the images with the Monsterous Confetti cuts and added goggly eyes to each of them.  


I die cut the new Wonky Stripe panel with Midnight cardstock and again from Stone cardstock.    I layered the die cut Wonky panel onto a Stone card base.    I then stamped the sentiment from Monsterous onto some Premier Polar White cardstock and trimmed down.    I then layered the sentiment along with the monsters onto the card panel.


For my last project today, I am sharing a really special Halloween treat that you can create with the new Clear Treat Box & Box Wrap Confetti Cut combo.   I stamped two of the monsters from Monsterous stamp set with white pigment ink onto Lead cardstock and then die cut with the Monsterous Confetti Cuts.    I die cut Midnight and Royal Purple cardstock with the Box Wrap Confetti Cut and before assembling, I added a stripe of scor-tape about a 1/4 of an inch from the top and added Martha Stewart fine glitter in black and purple to match each of the cardstock wraps.   


I stamped and heat embossed a sentiment for each of them from Monsterous using white and sparkling black embossing powder.  I filled each treat contained with some Hershey Kisses and then started putting the boxes together.    The wrap was placed around the clear box.  I added the sentiment and then layered my monster on an action wobbler so that they bounce around.   These containers hold a lot of candy!    You can pack them with anything! I just love color coordinating it with my papers and trimmings!   


Reverse Confetti is giving away a $15 gift certificate to one blog commenter and also to one Facebook commenter.  In addition, they will be giving away new product each day.    Please leave a comment on each sneak peak post for each designer.  Comments will close at noon CST on September 7th and the winner will be announced at 5pm CST on September 7th on the Reverse Confetti Blog and Facebook page! 

Please check out the Reverse Confetti Blog for all the details on the giveaways!!

Please be sure to check back with me for more sneaks on September 6th and 7th!  We will have a new release hop on September 8th.  All products will be available for purchase on September 8th! 

Hop along to see all the designers projects today using today's sneaks and leave a comment for a chance to win! 


Tricia Barber - that's me!
and 'Fetti Friend, 


Sunday, September 3, 2017

CAS(E) this Sketch #237 - Reverse Confetti

Happy weekend!   I am all into Halloween card making right now.   Once September hits, I am itching to start getting ready for fall, the cooler weather and decorating for Halloween!   I have made a number of Halloween cards that I will be sharing over the couple of weeks and by the time that October gets here, I will have moved on to Christmas!  ðŸ˜‚

Today I am playing along with Case this Sketch challenge.    The sketch was really simple which is sometimes a hard thing for me.   I love to color and layer as many images from a stamp set that I can on a card.  

So here is a clean and simple card for me, I don't have a lot of white space - I tried but the black card base won out!  But it is a really simple and easy Halloween card to make.  


I stamped and colored the bat images from Reverse Confetti Best Witches stamp set with Copic markers and trimmed them out.     I stamped the sentiment from Treat Yo' Self with Versamark and then white heat embossed it onto a strip of Midnight card stock.  


For my panel, I used Bristol smooth cardstock and sponged some Distress inks in Carved Pumpkin and Spiced Marmalade masking off stripes on the panel to create my own striped background.  I then spritzed it lightly with a spritzer and black Memento Markers.


Here is the link to the challenge CTS 237

Thanks for stopping by!   


Friday, September 1, 2017

Reverse Confetti Exclusive Newsletter Sneak Peak!


Have you signed up yet for Reverse Confetti's Newsletter?   What are you waiting for! I shared a super cool project this week! 

If you want to see more of my project and the inspiration for it, you need to subscribe!   The weekly newsletter contains exclusive content.  The Confetti Crew shares a project or card that can only be found in the newsletter.     To sign up and be inspired, please go to the Reverse Confetti blog and enter for your weekly newsletter today!


Also, you don't want to miss the Countdown to Confetti begins this Tuesday!    Please check out the Reverse Confetti Blog and the Confetti Crew's sneaks of the new release coming on September 8th!   


Happy Crafting!  


Monday, August 28, 2017

Addicted to Stamps #256 - My Favorite Things Beary Big Adventure

Happy Monday to you!    I am trying a new challenge blog - Addicted to Stamps and More!     I made a card with my My Favorite Things Beary Big Adventure.   I have had this stamp set awhile and just love the images.    I stamped and colored the image with Copic markers.


I stamped the background with Berrylicious ink onto Sno Cone cardstock with a Linen Background stamp from My Favorite Things.   (Which looks like it is retired now.)   I also die cut MFT Smooth White card stock with the Stitched Rectangle Scalloped Frames and my Sno Cone cardstock panel and then inlaid the panel into the frame and popped it up on a Smooth White cardstock base.    


I aso die cut several of the images with the same Stitched Rectangle Scalloped frame to tuck them into the scene.   The Bear was then popped up on some foam tape.   I stamped the sentiment in versamark ink and white heat embossed onto black cardstock.   I trimmed it down and popped it up on the card panel as well.   


Thanks for stopping by! 


Here is a link to the challenge blog: 


SaveSave

Saturday, August 26, 2017

Case this Sketch 236 - Get Well Soon Card!


Hello!   I am sharing a Get Well card that I made for my dad.  He has had a rough few weeks and has several more in front of him, so I wanted to cheer him up and created this card and gave him some words of encouragement.  


I die cut Rust cardstock using the Lacy Scalloped Frames and popped them up on kraft cardstock.    I stamped and die cut the images from Miso Happy stamp set with watercolor paper and added some light shading with my Zig and Copic markers.   I stamped the Get Well Soon greeting from Sentiment Essentials in Lime Green Ink and die cut with the coordinating Confetti Cut.   I cut it out three times and glued on top of one another to create dimension.     


I cut a banner from Iced Aqua cardstock and placed my sentiment on top of the banner.   I added my stamped and colored images.   Thanks for stopping to see me today! 


I used the sketch below from the Case this Sketch Challenge.  Here is the link to the challenge.   


SaveSave

Sunday, August 20, 2017

Color Throwdown Challenge - Magical Day Reverse Confetti

Hope you are having a fantastic weekend!     I played along with the Color Throwdown challenge this week with the pink, yellow and green.    This stamp set was perfect for the challenge.    I used Magical Day by Reverse Confetti.   I colored the images with my Copic markers and cut them out with the matching Magical Day Confetti cuts.  


For the background, I used the Large Eyelet cover panel and kept my card with a lot of white space.   I stamped my sentiment on a Pierced Rounded Top Layers Confetti Cuts.   I used a sentiment from Simply Sentiments and stamped in black ink.   I love this cute stamp set with the princess and dragon!   


Take a look at the Color Throwdown challenge; you have till Monday to play along!  Thanks for stopping by! 


SaveSave
SaveSave