Wednesday, December 15, 2021

SugarPea Designs Mix It Up Challenge - December

Hello!  I am sharing a Christmas tag I created today playing along with the SugarPea Designs Mix It Up Challenge!  With this challenge, you can use the inspiration photo or the sketch, or Mix It Up and use them both! 


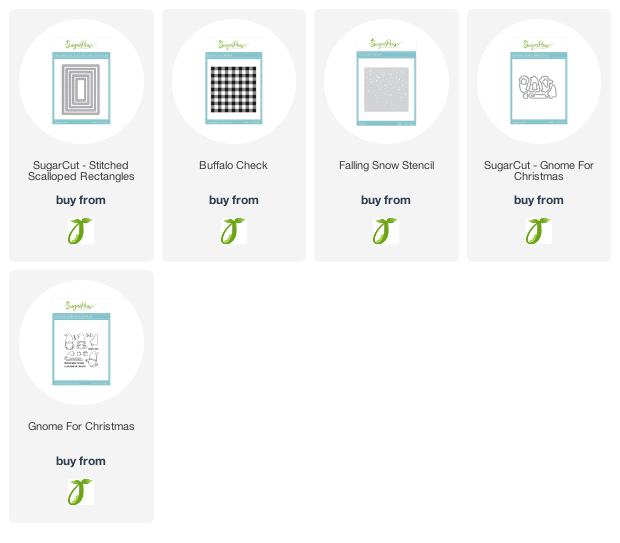
Instead of a birthday card, I created a Christmas tag!  I needed a few more tags for my Christmas presents, so I used the Gnome for Christmas stamp set along with the Stitched Scalloped Rectangles.  I started with die cutting two Stitched Scalloped Rectangles from kraft cardstock.   I used the Falling Snow Stencil and stenciled with white pigment ink onto one of the kraft die cuts.   I adhered both kraft die cuts together to create a really sturdy tag! 


I die cut a dark green panel with the Stitched Scalloped Rectangle die and then stamped the die cut with the Buffalo Check stamp with dark green ink.   I trimmed it down and adhered to the bottom panel of the tag.   I stamped the images from Gnome for Christmas and colored with my Copic markers.   I die cut the images with the Gnome for Christmas SugarCut.  I stamped a sentiment from Gnome for Christmas to the tag.   


Come play along in the challenge!   The full rules are below but you can also see this month's challenge and information on the SugarPea Designs blog post!  Thank you for stopping by! 


Wednesday, December 8, 2021

Reverse Confetti December Blog Hop

 Hello!  Welcome to the Reverse Confetti December Blog Hop!  I am knee deep in wrapping gifts and needed a few more tags for my presents.   The new Ornament Confetti Cut along with the Polar Party stamp set made for quick and easy tag making!  


I started out by die cutting with the Ornament Confetti Cut two Salsa, one Lime Green and three white Ornament die cuts.   I then mixed the white die cuts with the Salsa and Lime Green.  I doubled them up so that I have a finished front and back for my tag.   The back was left plain for me to add the To: and From: for the gifts.   Since the die cut will die cut the center as well as the outer ornament, I added a piece of copy paper in between to adhere them all together.   


I stamped sentiments on each of the tags using the Retro Holiday stamp set.  I positioned the sentiments to work with the images that I colored up for each of the tags.  I used one of the small snowflake images from the Retro Holiday and stamped repeatedly on the tag centers.  


I stamped the images from Polar Party and colored with my Copic markers.  Each image had red and green accents to go with the tags!  I added some details with a white gel pen.   I die cut the stamped images out with the Polar Party Confetti Cuts and added them to the tags with foam tape.  I love adding handmade tags to all my gifts!  This is one thing that I do every year! 


These tags were super easy and fast to create!   So much inspiration to share with you today in our Blog Hop!   Please be sure to check out all the inspiration below from all the designers!  I hope you enjoy hopping!   The next stop on the hop is Lisa Henke! 


Wednesday, December 1, 2021

Whimsy Stamps - Mini Release December


Hello! There is a new mini release with Whimsy Stamps today!  I am sharing Dragon Holiday Peekers with you.  They are so cute!  I colored each one of them images up with my Copic markers.  


I love the sentiments in this stamp set and chose two for the card.  Those little dragons may have been on Santa's naughty list!   I die cut the images out with the Dragon Holiday Peekers Outline die. 


For my card base, I used the Wonky Window 4 die and stamped one of the negative die cuts with the Nordic Background.  I stamped some snowflakes from the Bundled Up stamp set. 


Those cheeky dragons are so cute and you can find many more on the Whimsy Stamp store!  Check out what the design team has created below with the new mini release!  


Monday, November 29, 2021

Whimsy Stamps - Penguin Winter

I am sharing a new stamp set and die from Whimsy Stamps in this cute scene card.   Whimsy Stamps has some great Slimline shaped dies!   These are two new dies called Slimline Tapered Frames and Slimline Tapered Layers.  A spin on the basic sets that you can use to create great foundations for your cards! 


I used the new Penguin Winter stamp set and colored them with my Copic markers.   I trimmed the images out with my Scan and Cut and then added some details with a white gel pen and Distress Stickles!  


I love these snow filled trees!  How adorable!  I ink blended the background with Distress Oxide inks: Wilted Violet, Spun Sugar and Victorian Velvet.  I added some some with my white gel pen. 


Check out the new release at Whimsy Stamps!  
 

Sunday, November 28, 2021

Whimsy Stamps - Fill a Holiday Truck

 Hope your week has been filled with family, fun and food!  I love the time with family and really cherish these days.   This new stamp set Fill a Holiday Truck from Whimsy Stamps makes me smile!   This image can be used for so much more as well.   


Of course I had to color it red!   I love a good ole fashioned red truck and throw a Christmas Wreath on and OHHHHH YEAAAAAH!  It's holiday time, time for some snow, hot chocolate and Christmas lights!  And a little Ho, Ho, Ho! 


I layered my stamped and colored image onto a white panel that had been die cut with the Quilted Rainbow Inlaid die.  I layered the white panel onto a panel of the new 6x6 Christmas Eve paper pack. 


I stamped and embossed a sentiment from Dragon New Year.   Thank you for stopping by!  Check out the November Release and the new Fill a Holiday Truck stamp set at Whimsy Stamps! 

Saturday, November 20, 2021

Whimsy Stamps - Penguin Winter

 Hello!  Happy Thanksgiving!  I am sharing some new products from Whimsy Stamps November release.   I used the new Penguin Winter and the slimline Diagonal Dots Embossing Folder.   


I trimmed a card panel down for a slimline card and embossed the purple cardstock with the Slimline Diagonal Dots Embossing folder.   I layered this panel onto some navy cardstock.   I die cut a heart using the Connect Hearts Frame die and die cut from pink and white cardstock.   I layered this onto the embossed panel.  


I stamped the images from Penguin Winter and colored with my Copic markers.  I trimmed the images out with my Scan and Cut.   I layered them onto the panel with foam tape and added some Distress Stickles to the tree.   I die cut some snowflakes from the Shaker Maker Glitter Globe die set and added them to the panel with liquid adhesive.  


 I stamped a sentiment from Penguin Winter onto a Simple Sentiment Strips.   Check out the new release from Whimsy Stamps!!! 


Tuesday, November 16, 2021

SugarPea Designs - Hey Winter

Hello!  I am all inspired today with all things Holiday and created this simple Christmas card using Hey Winter and the Chevron Cover Plate.   


I stamped the bear from Hey Winter onto some kraft cardstock and then added some shadowing with my Copic markers.   The presents were colored with Copics and I stamped out my tree with olive green ink.   I layered the images from Hey Winter onto two panels created with the Stitched Rectangles and Scalloped Stitched Rectangles SugarCut.  


I die cut the holly and berries from the Pocket Tag Christmas Characters SugarCut and matched the colors in my card.   I die cut the Chevron Cover Plate from white and cherry red cardstock and layered onto an A2 card base.   I stamped a sentiment from Hey Winter.   


I love the pops of red and aqua against the white!   Off to make sugar cookies and playing holiday movies!   I hope you have a wonderful day! 


Wednesday, November 10, 2021

SugarPea Designs Mix It Up Challenge

It's a new month and there is a new challenge at SugarPea Designs!  I created this icy blue holiday card inspired by the color inspiration in the photo with this months challenge.   You can use the inspiration photo or the sketch for your entry or a combination of both!  


I started by stamping the houses from Happy Little Village onto light blue cardstock with light blue and dark blue inks.   I die cut the images out with the Happy Little Village SugarCut.  For my main panel I die cut with the largest die in the Card Front Element Builder SugarCut from blue cardstock with the Star Dust SugarCut.  I backed it with some white glitter cardstock.  It is hard to see in the photos but in real life it adds a lot of sparkle to mimic the ornament in the photo.  


For the snowy bank, I die cut white cardstock with the largest die in the Card Front Element Builder SugarCut and then die cut it again with the wavy border die that is also part of this die set.   I stamped a sentiment from Hey Winter stamp set and then added some blue crystal jewels.  


 Come play along in the challenge!   The full rules are below but you can also see this month's challenge and information on the SugarPea Designs blog post!  Thank you for stopping by! 


Whimsy Stamps - Stained Glass Window & Christmas Critters

 Hello!  There is a mini release available at Whimsy Stamps today!  I am sharing the new Stained Glass Window die set in my card today along with a few other October and November release products.  


I die cut the Christmas Eve paper pack with the new Stained Glass Window die set.  I created a window by using two of the dies to cut a center panel from the patterned paper pack.  I added these die cuts to a black card base.   


I stamped the images from Christmas Critters and colored with my Copic markers.  These are just adorable images!!!   I trimmed them out with my Scan and Cut.  I layered them onto the panel with foam tape.  I die cut the Believe Word & Shadow die set and added to the panel with foam tape as well.  I then finished off the card with some red & white twine! 


Be sure to check out the Whimsy Stamps new release!   Check out below some more inspiration and new release products with this month's mini release!