Saturday, December 28, 2019

Reverse Confetti - Birdie Buddies

I hope that you have had a nice holiday!  I have so much in store for January!  Make sure to stop back to my blog for the January Release from Reverse Confetti starting January 5th!  The new release go lives on January 8th.  In the meantime Reverse Confetti is having a sale!  See the graphic below for more details, the sale is on now thru January 1st.   


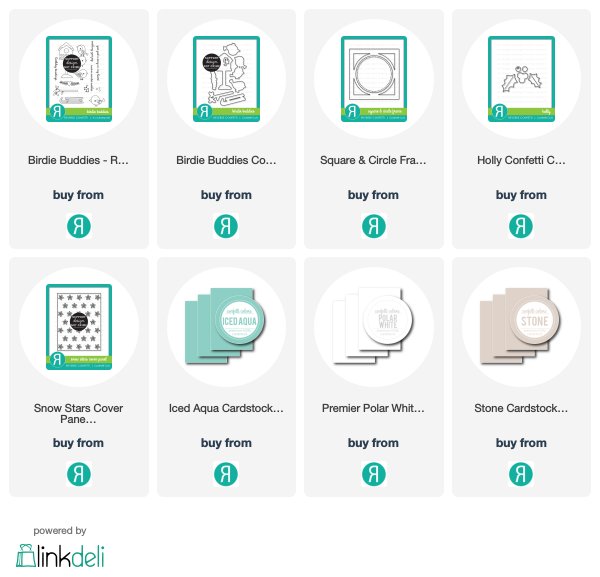
Today, I am sharing a slimline card that I made using the Birdie Buddies stamp set.   I created a wintery card to compliment this set.   I started with a 8.25 x 3.25 panel and then dry embossed the panel and off the edge die cutting technique so that the die did not cut the panel at a A2 size; allowing me to extend it to the full slimline panel.  This allowed the panel just to be embossed and not die cut.   I used the Snow Stars Cover Panel to add some texture to the background. 


I stamped my images from Birdie Buddies onto Premier Polar White cardstock and them colored them with my Copic markers.  I die cut them out with the Birdie Buddies Confetti Cuts.   The images were placed on top of a stitched circle that is from the Square & Circle Frame Confetti Cuts and inked with Distress Oxides inks (Wilted Violet and Shaded Lilac).   


I added more of a wintery feel but die cutting the Holly Confetti Cuts from just plain white cardstock and added Distress Glitter in Clear Rock Candy to the berry to make it sparkle.   I stamped and embossed the sentiment onto some Iced Aqua cardstock.   


I then placed the panel onto a card base made from Stone cardstock.   To finish the card off, I added some details with my white gel pen and clear sparkle pen.    Please check back with me for sneak peeks for the January Release on January 5th -7th and Blog Hop on the 8th.  Thank you for stopping by! 


Thursday, December 19, 2019

SugarPea Designs - Christmas Gift Card Holder

Hey there!  As I was preparing to create a holiday card, my son had this idea to create a card with Santa making a special delivery using the new English Bond Brick Wall Stencil along with the Pocket Tag Christmas Characters SugarCut  So from there, this idea really came together and turned out really cute!  This card already has a recipient in mind and will be in the mail as we speak!  


I started by die cutting all my pieces to create the Santa using the Floral Pocket Tag and Pocket Tag Christmas Characters.   I created the whole tag and had that ready to assemble with my chimney card base!   


I went with a slimline card design with the panel dimensions of 3 3/8" by 8 1/2 inches.   This allowed my Santa to pop up from the chimney and have plenty of room to slide between the panels.  To create the chimney, I cut a piece of red card stock to 3 3/8" by 4 1/2 inches.   I used the new English Bond Brick Wall Stencil with Gina K Glitz Glitter Gel in Red Velvet.   It worked perfectly with the stencil and created the brick for my chimney.  I used the Postage Stamp Sugar Cut to create a chimney cap.  I wanted to have a roof top but there was just not enough room so I opted to have a snowy base using one of the border dies from the Card Front Element Builder SugarCut.   This also gave me a great spot to put my sentiment using the Oh So Jolly Sentiments.   I stamped the Merry Christmas scripty sentiment in Versamark Black Onyx ink and clear heat embossed it.  


For the main panel, I ink blended with Distress Oxides in Tumbled Glass, Blueprint Sketch and Black Soot.   I made sure that I had enough ink blending to come down past the chimney.  I added some glittered stars using the Stacked Stars SugarCut. 


To allow the Santa tag to come in and out of the chimney, I cut a slit to make a slider - you need it wide enough to allow the Santa to come up and out but not fully out.   It is about 2 1/2 inches long and 3/8" wide.  You can use two pennies to create the slider putting one under the panel and then one on top with some foam tape holding them together and allowing to slide up and down the 2 1/2 inch channel.   However, this does add weight to the card, so I just used two circles made from cardstock and then cut some foam tape smaller than your channel to slide up and down.  I doubled the foam tape between the circles.  Place one circle under your main inked panel, then adhere the doubled up foam and place the other circle piece on top.   I did use my embossing buddy along the channel so that the foam tape did not stick to the mechanism.   The tag was then adhered to the circle slider mechanism.    


I used two layers of foam tape to adhere my chimney to the inked card panel.   This will allow the tag to move up and down pretty easily.   Since this is also a card, I wrote my holiday message on the inside to my niece!   

I loved how this turned out and you could also use this for the reindeer or the elf!    I hope that you have a wonderful holiday season!  


Friday, December 13, 2019

SugarPea Designs Sweet Peek Week - Day 5


Today is the last day of the SugarPea Designs Sweet Peek Week!   All products will go live at SugarPea Designs shop at 6 pm EST!   I love creating little sweet gifts and can't wait to share these with my friends and coworkers.    


We are sharing a super sweet stamp set called Heart Prints that has some pretty unique patterned hearts!   Also releasing is the SugarCut Simple Heart that will trim the patterned hearts to the perfect size so that it cuts right along the stamped image.   


I decided to made little sweet treats using some of my favorite dark chocolate candies.   I used a small glassine envelope and filled it with several chocolate hearts.   For the back of the envelope, I die cut the SugarCut Simple Heart from red cardstock and then ran them thru my Xyron Sticker maker and made several red heart stickers super quick.   I used these to seal the back of the glassine envelopes.   


To make the tags, I used the rounded tag die from the Card Front Element Builder II SugarCut and die cut it from several colors of cardstock - in case you missed it, I had pulled out all my pinks and red card stocks and they have never left my desk!   I keep reaching for them.   I love making Valentine cards and projects!   


I stamped several of the hearts from the Heart Prints stamp set.   There are 4 patterns and 1 solid heart images along with 7 sentiments.   I used several colors of pink and red inks and then die cut the hearts with the SugarCut Simple Heart.    I die cut the banner from the Card Front Element Builder II SugarCut and again did it from different colors of cardstock and stamped some of the sentiments from Heart Prints onto the banner strips.   


I popped the banner and the heart up on the tag with some foam tape and then tied them to the glassine envelopes with red & white twine like I was wrapping a package.   This is another easy idea to do for creating multiples.   I love the simplicity of this design.  


Take a look at all the Designers Inspiration using Heart Prints!    Remember that all the products will go live in the SugarPea Designs Shop at 6 pm EST December 13th!  Tell me below what is your favorite from the December release?   Have fun shopping!

Have a wonderful holiday! 


Thursday, December 12, 2019

SugarPea Designs Sweet Peek Week - Day 4


I am back with the SugarPea Designs Sweet Peek Week!   I could not help myself today!   I had to continue the Valentine theme with the cutest stamp set called Love Machine!  


It has some really cute robot images that are so much fun to color up.   I paired them with the new Dangle Hearts Cover Plate!   I had all that pink and red cardstock on my desk from Day 3's project that I could not resist to use my favorite of the color combinations:  Bright Pink and Red!   


I stamped the images from Love Machine onto Neenah 110lb cardstock and colored with my Copic markers.   I added details by using the "dot" technique to the shadow areas and used my white gel pen to add highlights.   


To accent the cards, I wanted to add a pop of white so for my first card, I used the new SugarCut Valentine Word with Shadow.   Yesterday, I used the shadow cut with the "love" word but today, I kept it simple and just used the word die.  It gave that perfect pop of white against the bright pink and red.    


You may not be able to tell in the photos but I actually die cut the Dangle Hearts Cover Panel three times  (2 from one color cardstock and 1 other color) and then did the die cut inlay technique.   For my second card, I used some of the smaller dies from the SugarCut Postage Stamp X's and O's and added them to my card panel for the pop of white.   


For the sentiment on the first card, I stamped and white embossed the sentiments onto black cardstock and added to the panel.   For the second card,  I stamped onto a sentiment strip from the SugarCut Snow Globe set and used a sentiment from Sentiments of Love that we showed you yesterday. 

Thank you for joining me today!   Remember to head over to the SugarPea Designs Blog and check out the post for Day Four and see all the details for the products being shared today along with more details on the giveaway.    Be sure to stop along to all the Designer Blogs and take a moment to comment along the way!   The new release will be available Friday, December 13th at 6 pm EST!  We have one more day of Sweet Peeks for you tomorrow! 


Wednesday, December 11, 2019

SugarPea Designs Sweet Peek Week - Day 3

Welcome back to the SugarPea Designs Sweet Peek Week Day 3!  Today, I am all about the love and Valentine's Day!!!!  

It's not too soon to be thinking about Valentine's Day.  I know we have not even celebrated Christmas or New Year's but I love getting a head start on!   I am such a planner nerd.   These cards would be super easy to recreate and make multiple versions.   I created my own background using the new Sentiments of Love stamp set and the Love Word with Shadow SugarCut.   


I pulled out some pretty pink and red inks and cardstock and got to stamping!   I love stamping out backgrounds and stamped the large LOVE repeatedly across the panel.   I eyeballed the stamping using the tail in the "e" and "l" along with the "o" to determine my placement.    I used one of the tiny hearts to stamp in between the words.   


I die cut the panels with the Card Front Element Builder.   I die cut the Love Word with Shadow SugarCut three times from matching cardstock and then layered it on top of one of the stamped Love's.  


I used the sentiments in the set and stamped several of them onto a piece of black cardstock and white embossed them.   I then trimmed them down to sentiment strips and then started placing them on the cards.  I just love the shadow die with the scripty Love word.  


I love all the pinks and really like how they all turned out.   But my favorite is that is this one!   I am a lover of bright and bold colors!    

Thank you for joining me today!   Remember to head over to the SugarPea Designs Blog and check out the post for Day Three and see all the details for the products being shared today along with more details on the giveaway.    Be sure to stop along to all the Designer Blogs and take a moment to comment along the way!   

Come back Thursday and Friday for some more of the December release!!!