Sunday, March 28, 2021

Whimsy Stamps Gnome Think Spring

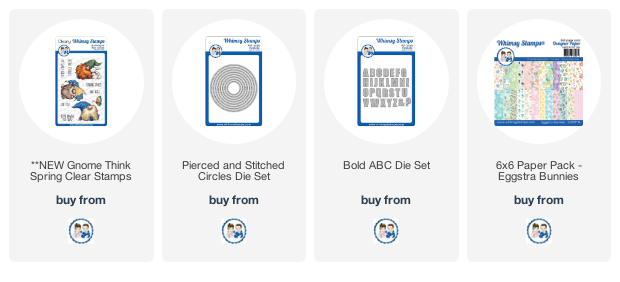
Happy Spring!   I hope you had a lovely weekend!   I am popping in to share an adorable stamp set from the Whimsy Stamps latest release called Gnome Think Spring.   It has the cutest images.  You can preorder it now.   


I stamped the image out onto Neenah Solar White cardstock and colored with my Copic markers.   I die cut the image out with the Pierced and Stitched Circle dies.   


I layered this onto some Eggstra Bunnies 6x6 Paper pad.   I covered the entire card panel.   I layered some bright pink cardstock onto the panel and used the Bold ABC die to create the Hello.  I die cut multiple die cuts and layered onto each other for more dimension.   I stamped a sentiment from the Gnome Think Spring onto white cardstock and trimmed it out.   


Be sure to check out more of the Whimsy Stamps release here!


Tuesday, March 23, 2021

Whimsy Stamps & Cardstock Warehouse Instagram Hop!


I am doing an Instagram Hop today with Whimsy Stamps and Cardstock Warehouse!  Hop over to my instagram page @triciabarber11 to join along in the fun and chance to win!  See details in my instagram page where you see this logo!  

Here is a peek at my projects: 


Full list of supplies below: 

Cardstock Warehouse:


Saturday, March 20, 2021

Whimsy Stamps - Blending In

 Hey there!  I am sharing this card I made with the new Blending In stamp from Whimsy Stamps.  This stamp is being released today as part of the mini release!   


I stamped the image out and colored with my Copic markers.  Do you see the little kitty with all those cute puppies?  I used the matching Blending In die to die cut out the image.  So much fun to color.   I love puppies!   I layered the puppies onto a black card panel die cut with the Faadoodles Frames Scalloped Rectangles die.  I layered this onto some Starring Hearts paper. 


I could not help but use the Meow die cut from the Kitty Cat Extra die set.   I die cut out three of the Meow's and then stacked them together.   The little hearts are from little bits and pieces of the Slimline Hearts Background die.  


Be sure to check out the new mini release from Whimsy Stamps!!!   


Tuesday, March 16, 2021

SugarPea Designs - Lucky to Have You

 Hey there!  Happy St. Patrick's Day.  I thought I would make a lucky birthday card for my sister.  Her birthday is the day after St. Patrick's Day.   


I started off with the Gradient Stripes Stencil with some light green cardstock and ink and gave my card base some beautiful stripes.   I die cut kraft cardstock with the Scalloped Rectangles and then die cut a white panel with the Stitched Rectangles.   I added them to the green card base with some liquid adhesive. 

I stamped out the images for Cottontail Cuties and colored them with my Copic markers.   I die cut the images out with the Cottontail Cuties SugarCut.   I added them to the panel with foam tape.   I stamped a sun onto the panel using the Cheers to You stamp set and yellow ink.   

My sentiment comes from the Friendship Sentiments stamp set.   I added some final details with some stickles and white gel pen.   Thank you for stopping by!  


Sunday, March 14, 2021

Whimsy Stamps - Open Door

 Hello!  I am sharing a get well soon card with the Open Door stamp set.   I stamped the image out and colored in with my Copic markers.   There is so much detail in this red rubber stamp.  I used a loose Copic coloring style.   Such a beautiful stamp!   


I trimmed the image down and layered onto some black cardstock.   I then layered this onto Extreme Postage Die Set. 

I layered this panel onto a kraft cardstock.  I stamped a sentiment from the Butterflies stamp set and die cut it with Quick Strips die set.  I finished it off with some help twine.   


Thank you for stopping by! 


Saturday, March 13, 2021

Whimsy Stamps - Magnolia A2 Die

 Hello!  I am sharing this quick and easy card that I made with the new Magnolia A2 die from Whimsy Stamps.   This is such a beautiful die!   It can make for quick and simple cards.  I have a bunch of watercolor panels that I have created and just put to the side.  I went through my stack and found this pink and purple watercolor background.  I trimmed it down to A2 size. 

I die cut the Magnolia A2 die from white cardstock and then layered it onto the watercolor panel. I laid some heavy books on top to make sure that it adhered really well to the panel.  

I stamped a sentiment from Simple Sentiment Strips.   I trimmed it down to fit across the panel.  Quick and Easy!   Take a look at the new release at Whimsy Stamps!  

Thank you for stopping by! 


Thursday, March 11, 2021

Whimsy Stamps - Unicorn Kisses

 Hey there!  I am popping in to share this card made with some of the March release from Whimsy Stamps.   I created this card using the Unicorn Kisses stamp set along with the new Slimline Clouds Die set and Glorious Sky paper pack. 


I die cut the new Slimline Cloud die set from white cardstock and some glitter cardstock.   The panel fills a slimline card.  The new Glorious Sky Slimline paper packs are so much fun and love how they perfectly fit.  


Isn't the new Unicorn Kisses stamp set adorable?   I stamped it out onto Neenah cardstock and then colored with my Copic markers.  I trimmed it down with my Scan and Cut.  I added some details by dotting some colors with my Copics and a white gel pen. 


I stamped a sentiment from the Unicorn Kisses stamp set and die cut with the Zig Zag Stitched Rectangles die.  

Here is some more inspiration from the Whimsy Stamps March release! 


Wednesday, March 10, 2021

Whimsy Stamps - March Mini Release

 Hello!  I am sharing a birthday gift card holder using some new products from Whimsy Stamps.  
I used the new Slimline Pocket die along with the new Chevron Background stamp.   I love the new Slimline Pocket die, it looks just like a jean pocket.   I stamped some fuse green cardstock with the Chevron Background stamp and then die cut it out with the Slimline Pocket die.  


I die cut the small tag using the mini tag in the Slimline Pocket die from navy cardstock.   I layered my pocket on top of the card panel that had been covered with Lattice A2 die.   


The sentiment is from Sentiment Essentials and was stamped onto a Quick Strip die cut.   I added some flowers from the No-See All Seasons Tree die.   


Thank you for stopping by!   Here is more inspiration from Whimsy Stamps!  Check out more of the release here! 


Monday, March 8, 2021

Reverse Confetti March Release Blog Hop!

 Welcome back to the Reverse Confetti March Release Blog Hop!  All the March products are available now at Reverse Confetti.  I am sharing the so sweet and adorable Enchanted Garden stamp set!  


I stamped my images with Versafine Onyx Black ink and heat embossed with clear embossing powder.  I then colored all the images in with my Karin and Zig markers.   I added some details to the images with my white gel pen and some Diamond Stickles.   I free hand cut a sloped ground and then stamped a sentiment from Enchanted Garden


The make the background, I used the Plaid Lines Small Confetti Cuts and die cut from some lightweight cardstock.  I then used this as a stencil and used Piggy Bank ink to ink blend with my stencil over the main panel.  After I did one layer, I shifted the stencil and ink blended again to build up the plaid background.  To add a little bit of fun, I added a penny to the flying fairy to allow her to go up and down.  I added a little Piggy Bank heart from the You Confetti Cuts to pull it up and down. 


What is your favorite from the new release?   I don't know if I could pick just one!  Join us below for a big hop to celebrate!   Don't forgot that the new release is available now!