Tuesday, November 22, 2022

Concord & 9th - Mistletoe Messages

 Hello!  I am sharing more tags that I created with the Concord & 9th Mistletoe Messages!  This stamp and die set is so each to create tags and cards for Christmas!  Super easy to create multiples with this set. 

To see more, hop over to Instagram to see more inspiration! 


Monday, November 21, 2022

Taylored Expressions - Frosty Backgroun

 Hello!  I had some fun this weekend creating Christmas Tags with the Taylored Expressions Frosty Background and the Fill in the Blank Christmas stamp sets.   These were super easy to create!  Hop over to Instagram to see my reel!   


Saturday, November 19, 2022

Pixi Dust Designs - Music Box


 Hey there!  I am popping in today to share a gift box I made with the Music Box die from Pixi Dust Designs.   I took a different spin on this die as I love to make my supplies stretch and show that they can be used in a variety of ways.  I used some older patterned paper that I had and added some aqua cardstock.  I die cut all the pieces and put together the box. It is super easy to put together.


I due cut two of what I will call the liner.  This helps to make the box sturdy.  This is part of the music box of the die.   I added the candy so that you can see the size of the box. 


You can see more ways to use this die at Pixi Dust Designs.  


Monday, November 7, 2022

Pixi Dust Designs -Gingerbread House Mug Die

 Hello!  I am sharing some tags I made with the new Gingerbread House Mug die set!  This set is just too cute!  I decided to go all pink, red and aqua with these tags.   They are for some special presents that I have for trip that I am taking!  Cannot Wait! 


I used the little gingerbread boy and girl from the Christmas Gnome Mug die set.  They looked so cute with the Gingerbread House Mug die.   


I doubled up the mug, whip cream and lollipop and added a white backer to make the tag more sturdy!  


Check out the new release at Pixi Dust Designs! 


Friday, November 4, 2022

Pixi Dust Designs - Guest Designer

 Hello!  I am popping in to share some new products from Pixi Dust Designs!   I am guest designing with the new release available November 4th!  

First up, I used the new Mrs. Claus Mug die set.  This is so adorable!  I die cut the pieces and had so much fun putting this together.  All the details are just too cute.  I used some of the additional images from some of the other new items like the tiny cookies and icing.  


Next up is the new Snow Globe die set and this set is huge!!!  It is absolutely perfect for making shaker cards.   I used the new stamp set called Holly Jolly and colored the Gnome with a little fox and the teddy bear.  I added some of the snowflakes from the Gnome Mug die set.


Next up, I used the new Gnome Mug die set and used some of my Copic markers to add dimension to the die cuts.  I used one of the sentiments from the Mug Add On die set to die cut out the Warm Wishes and added to his beard! 


These turned out so cute!   I had so much fun creating these projects today.  To find out more about these products, please visit Pixi Dust Designs!  This is a new to me company and I had just ordered the Reindeer Mug that has been previously released!   


Monday, September 19, 2022

Stamptember Exclusive with Reverse Confetti

 Hello!  I am joining in with the fun this month with the Simon Says Stamp and Reverse Confetti collaboration set called Fa La La Trees for Stamptember.   

I love when a set allows you to get creative and with these sets that you can build as you like, there are so many possibilities.   I have a much different card that I will be sharing later!   


For this slimline design, I stamped out the striped tree and then with the outline repeating the pattern across the panel.   I then stamped separately, the tree with the branches and used a dark and light green ink.  I hand trimmed the trees out.  I then turned the slimline panel upside down and added the green trees with foam tape.   

I layered the panel onto some aqua cardstock and then added crystal sequins to mimic snow.   I stamped a sentiment and white embossed it and trimmed it down to a small strip and layered across my trees.   

Hop along over to Simon Says Stamp to see what other designers have in store for you! 


Friday, September 2, 2022

Coffee Loving Cardmakers for a Coffee Date!

 Hey there!  I am joining the Coffee Loving Cardmakers for a Coffee date today!  I am so excited to be Amy's Coffee date. Amy invited me years ago to be on a design team and we have worked virtually together for several years.  I just love her style and love to see what she is up to on her blog and instagram page!   She shared with me the inspiration photo below and I pulled the colors for my card using the inspiration photo!  Now, I must confess, I am not a coffee drinker but I do love hot chocolate!!!!  


I had the perfect stamp set that I picked up last year during the holidays but never stamped up! The stamp is from Elizabeth Craft Designs and it is called Marshmallow Snowmen.   It has the cutest images and I loved the one that I used on my card today! 


I used some stamp masking to mask off the peppermint candies with the hot chocolate mug.  I stamped the main image directly onto a die cut circle.  I colored the image with my Copic markers.   I love the little marshmallow snowman! How cute is he!  


I love the pinks and aquas in the inspiration photo and found the perfect colors to create this card!  


I stamped a sentiment from Concord & 9th called Mistletoe Messages.  It was perfect for a warm a toastsy greeting.   I used some patterned papers using the Reverse Confetti Winter Solstice.   For some finer details, I added some Distress Stickles in Diamond to the gumdrop cap and some details with a white gel pen.   


Hop over to the Coffee Loving Cardmarkers Blog and check out all the cute and fun inspiration just waiting for you!   She has a giveaway today to share!   Have fun! Cheers! 


Thursday, September 1, 2022

Reverse Confetti - Stock Your Stash Challenge

Hello!  Tricia here with you today to share a slimline Halloween card with some Distress Oxide blending. I used Boo Day along with Spooktacular stamp sets.   I stamped my images out and then colored with Copic markers.  I love how the ghosts look like they are glowing!   I used the matching Boo Day and Spooktacular Confetti Cuts to die cut the images out. 


To make the background, I ink blended with Distress Oxides inks in Black Soot, Villainous Potion, Shaded Lilac and Antique Linen.  I masked off the moon and then used some of Villainous Potion and Shaded Lilac to creep in a shadow on the moon.   I then splattered the background with white paint.  I added to a slimline panel and then added a strip of black cardstock. 


For the sentiment, I used the Trick Or Treat Confetti Cuts and ink blended with Distress Oxides in Carved Pumpkin, Crackling Campfire and Mustard Seed.  I backed the cardstock with some Stick It Adhesive and then die cut with the Trick or Treat Confetti Cuts.   I added some Nuvo Crystal Glaze to the sentiment.  It can get a little messy.  I used a small needle to try to spread to the edges.   


I then started to adhere my images to the card popping some up with foam tape and others were adhered directly to the card panel.   For my bats, I recently saw Nichol Spohr color up bats and used some similar colors to make them glow in the moonlight!   I added some crystal sequins to finish it off! 


Come play along with the Stock Your Stash Challenge! Be sure to tag your card using #SYSChallenge  Have a great day!


Monday, August 8, 2022

Reverse Confetti August Creative Blog Hop

Hello!  Welcome to the Reverse Confetti August Creative Blog Hop!  We have a ton of inspiration to share with you today!  I am sharing a Halloween treat container that has been dressed up with a little bit of foiling.  


I started by creating a Halloween tag using the Patterned Panels and the Lovely Tag Confetti Cuts.   I stamped a panel using purple, orange, yellow and black inks and then die cut the stamped panel with the Lovely Tag Confetti Cuts.   I added the Layered Boo Confetti Cuts onto the top of the tag. 


The Boo was layered onto the shadow die cut with foam tape.  I die cut another Lovely Tag from white cardstock and then added to the stamped tag.  I attached it to my bag with a button and twine. 


 I die cut two purple panels with the Bag & Tag Creator Confetti Cuts and then inked a striped background with Villainous Potion Distress ink.   I foiled a little banner with the Hot Foil Combo - Elements.   I trimmed it down to fit across the die cut window.   I added some acetate to the window and filled a treat bag with some Halloween kisses.    Check out the Blog Hop below for a ton more inspiration to get your craft on today!    Have fun hopping! 

Reverse Confetti

Andrea Shell

Sandhya Iyer

Maria Russell

Lisa Henke

Lien Leysen

Angela Simpson

Amy Kolling

Heather Ruwe

Tricia Barber

Dana Kirby

Joy Baldwin

Jeanne Jachna

April Antonio

Amy Tsuruta

Colleen Beamish


Friday, July 15, 2022

Reverse Confetti New Summer Release Blog Hop

Hey there!  The new release from Reverse Confetti is now LIVE and available for purchase.  Today we have a huge blog hop to celebrate the release AND the new HOT FOILS available from Reverse Confetti! I am just getting my feet wet with Hot Foils but I have to say that I would like to foil all the things! 


For my first project, I used the new Dog Days stamp set and colored up the images with some bright and bold colors!   I die cut the images out with the matching Dog Days Confetti Cuts.   I added some clear glaze to the gold sunglasses and some white gel pen details.   


I used the new Hot Foil stamps called Elements.  This comes with a matching Confetti Cut to die cut the Element image out.   Like I said, I am just getting my feet wet with the Hot Foil but I found it to be super easy and so much fun!   I love the pop of gold on my card!   


The sentiment is from the new Dog Days Sentiments.   I used the new Deco Cover Panel for the bottom of my card panel and used light blue cardstock.  I love these new products!!   The Deco Cover Panel adds so much detail and I used it on another card that I am sharing today! 


For my next project, I used the new Sunny Flower stamp set.  I stamped a background using various blue inks.   I trimmed the panel down and used the new Hot Foil Combo - Elements and the Hot Foil Combo Birthday Wishes. 


For my next card, I used the same color scheme and stamped the Sunny Flower image and then die cut with the matching Sunny Flower Confetti Cuts.  I stamped a sentiment from Sunny Flower stamp set.   


I layered the flower and stamped sentiment onto the new Deco Cover Panel.  Super quick and easy card! 


That is all for me today!   Take a cruise around the blog hop for a ton of inspiration!  All of the products are available now! 


Reverse Confetti

Rachel Alvarado

Andrea Shell

Susan Wymer

Sandhya Iyer

Jenny Colacicco

Maria Russell

Lien Leysen

Heather Ruwe

Lisa Henke

Angela Simpson

Cheiron Brandon

Tricia Barber

Amy Kolling

Becky Roberts

Dana Kirby

Joy Baldwin

Amy Rohl

Jeanne Jachna

Kelly Lunceford

April Antonio

Audrey Tokach

Michelle Short

Amy Tsuruta

Colleen Beamish

Thursday, July 14, 2022

Picket Fence Studios Release - Guest Designer

Hello!  I am joining the Picket Fence Studios this month for the July release!  I have three projects to share with you today using just some of the new products releasing this month!   

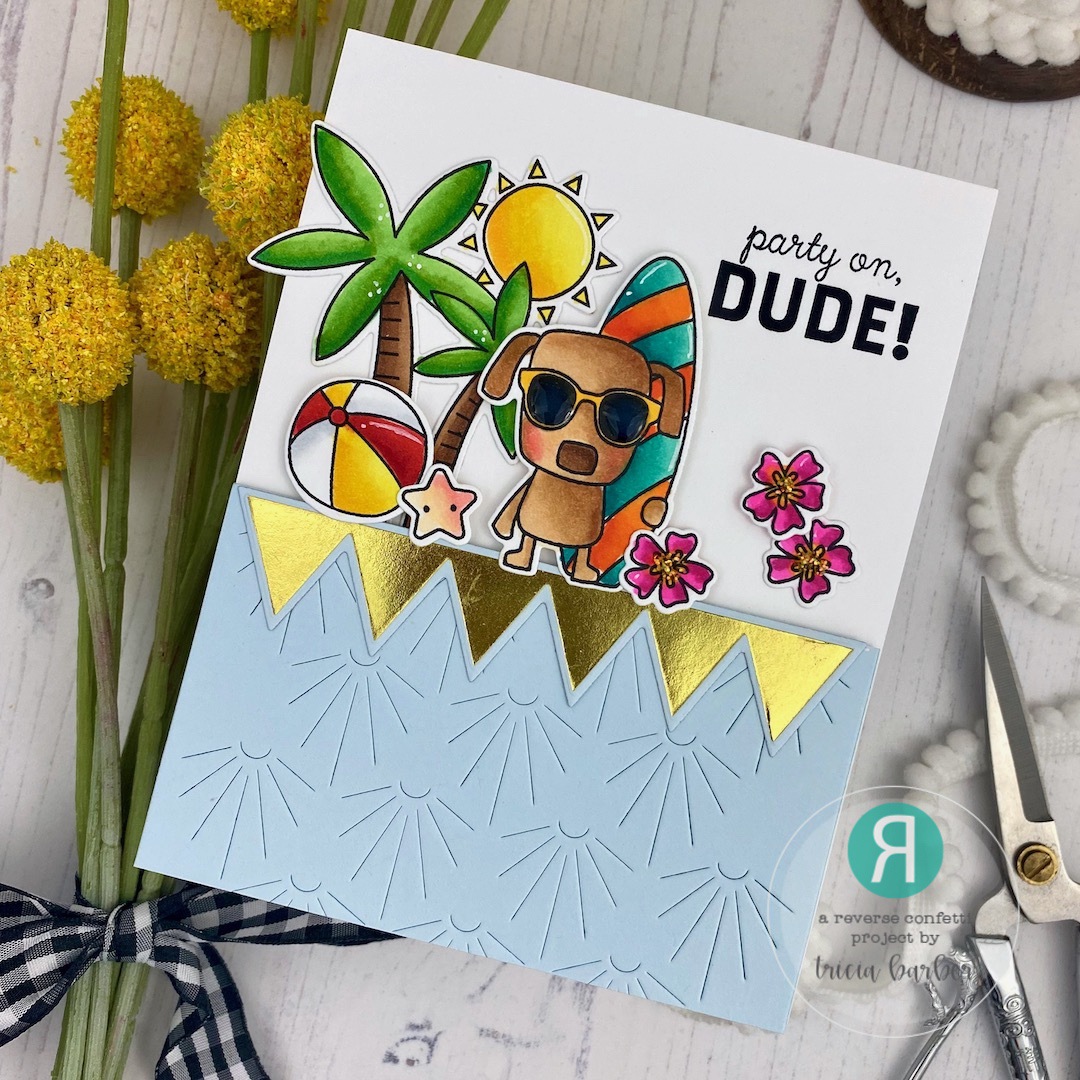
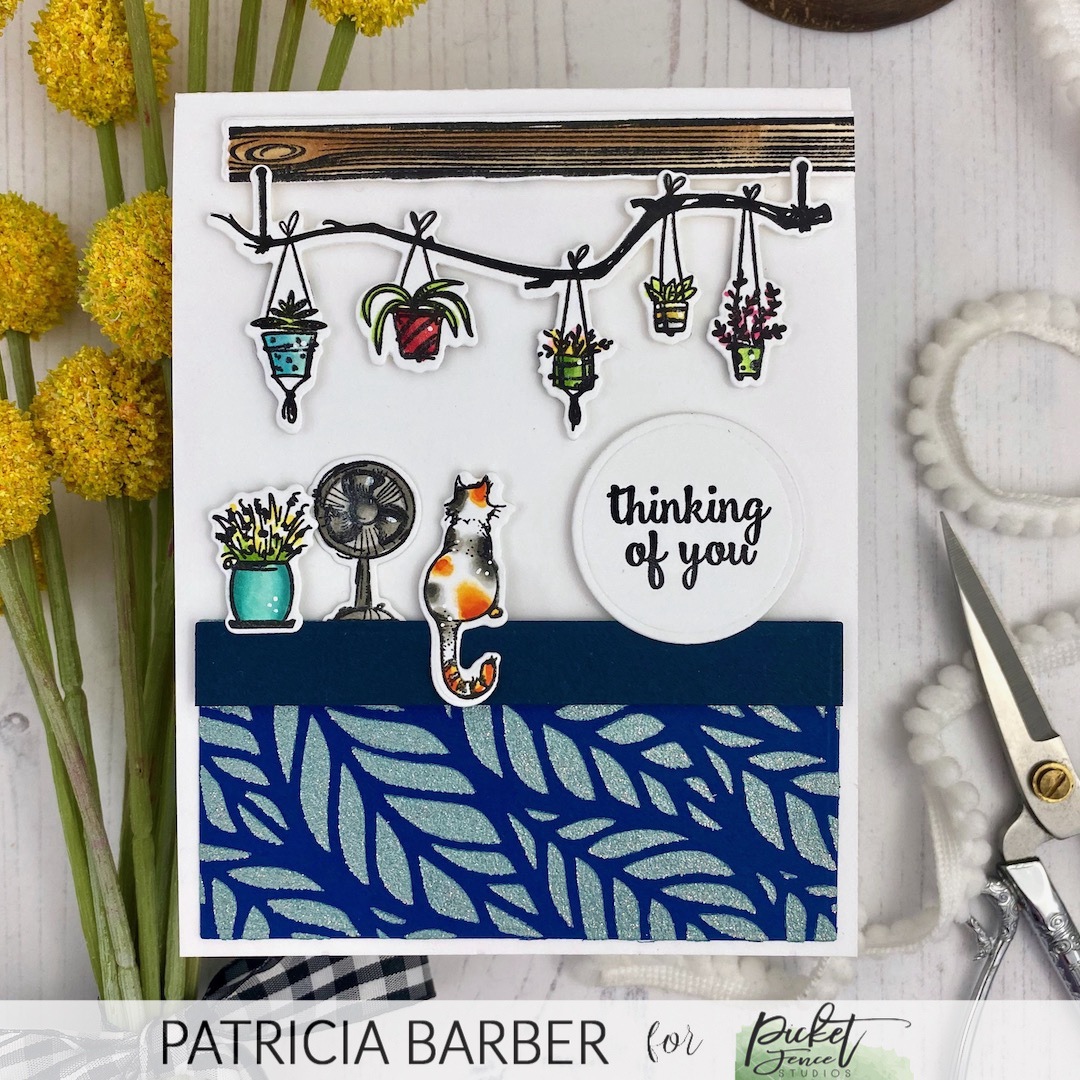
For my first project - I created a scene card.  I just love making scene cards.   The stamp set is called a Window Seat to the World.   It has some great images.  I stamped out all the images and colored with my Copic markers.  I die cut the images out with the coordinating Window Seat to the World die.   I love all the tiny little images that you can use to create multiple different projects.   For the base of my card, I wanted it to appear like wallpaper and used the new Shadow of Leaves stencil and Paper Glaze Luxe in Spanish Moss.   How beautiful is that glaze! It has a ton of sparkle!  So smooth and thick - easy to work with and clean up!  I added a small navy stripe and then added my sentiment.    I love the branch with the hanging potted plants and the little calico kitty!  


Project 1: 
Window Seat to the World stamp set and coordinating die 


Shadow of Leaves Stencil 


Paper Glaze Luxe - Spanish Moss


For my second project, I used the new A Mum stamp set.   I stamped the image and then blended with various yellow inks onto the stamped image and then die cut out with the matching A Mum coordinating die.   The sentiment is from Window Seat to the World stamp set.   Take a look at the details in the new Lavish Negative Strip die!  What a beautiful die cut that created not only the die cuts but the etched lines in the image!  It is so beautiful!  This die can dress up any card base!   I added a few of the new Yellow Bottle Cap Flowers sequins mix to the panel.   I created tiny flowers with the flowers and the sequins.   To finish off my card, I added some details with a white gel pen. 


Project 2: 
A Mum stamp set and coordinating die 


Lavish Negative Strip die 


Yellow Bottle Cap Flowers Sequins Mix 


Window Seat to the World stamp set 


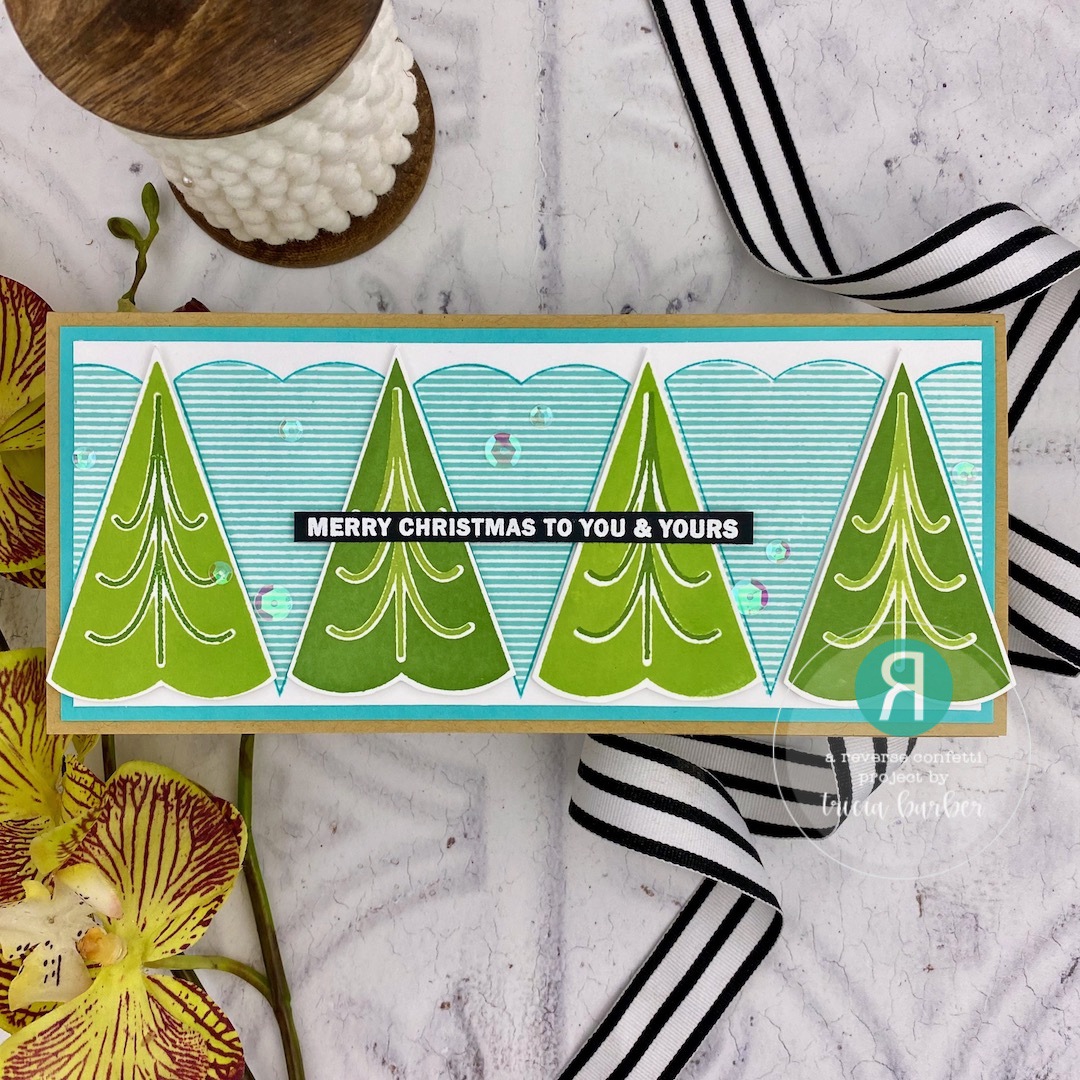
For my final project today, I saved the best for last!   This release included some wedding themed products and I could not help but see a wedding dress when I saw the curtain stamp in the Window Seat to the World, would you every guess this was two window curtain panels that I made into a dress?   I thought this would be a fantastic card for the bride to create for her bridal party to invite them out for shopping for wedding attire!    I stamped and die cut out the two window panels from Window Seat to the World and then pieced them together and turned it upside down on my card.   I added a Yellow Bottle Cap Flower from the sequins mix to the "ribbon belt" of my dress.   I die cut the words "I Do" out from several layers of white card stock and then topped the die with a gold die cut.  The I Do is from the Slim Line I Do Cover Panel.  I added the images to a Slim Line card that had been stenciled with the Slim Line Shadow of Leaves stencil and light aqua and dark aqua inks.   To finish it off, I added some clear sparkle to the dress!  


Project 3: 
Window Seat to the World stamp set and coordinating die 


Slim Line Shadow of Leaves Stencil


Yellow Bottle Cap Flowers Sequins Mix 


Slim Line I Do Cover Plate 


 Be sure to checkout the Picket Fence Studios blog for more information regarding the release!   So many great projects and this is only a small sample of the great products that will be available now!