Saturday, June 27, 2020

Whimsy Stamps - Dragon Water Fun - More FUN!

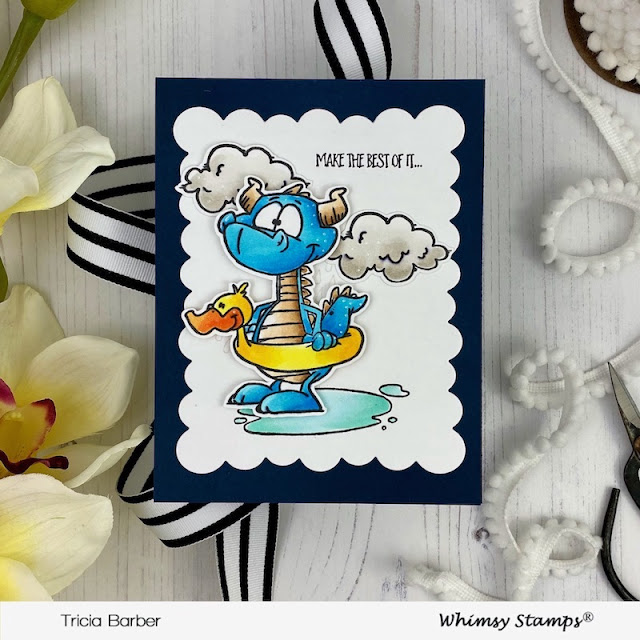
I am back again today to share another card that I made with the Dragon Water Fun from Whimsy Stamps.   I just love this stamp set and had to make another card with the other dragon.   I stamped the image and colored it with my Copic markers.   I love his little ducky inner tube!  I stamped a couple of the clouds.  I used my Scan and Cut to cut out all the images.   


I used the FaDoodles Frames Scalloped Rectangle Die and stamped the water puddle from the stamp set and colored with my Copics.   I stamped a sentiment from Dragon Water Fun.   I just love the sentiments in this set.    I added some clear sparkle to the water and other parts of the images.  


Isn't this the cutest stamp!  There are several stamp sets with this dragon, I can't wait to get more!!!  


I added the panel to a dark navy card base.   Isn't this set the cutest!   You can see more of the mini release here at the Whimsy store!  Check out the new mini release today
I hope that you have a great day! 


↠↠↠💗↞↞↞
Tricia 

Supplies I used today!

Friday, June 26, 2020

Whimsy Stamps - Giraffes Peeking

Hey there! Popping in to share another card from the recent mini release with Whimsy Stamps!   This one is totally cute and called Giraffes Peeking!   It has three really cute giraffes.   I made this card using the new FaDoodles Frames Scalloped Rectangle dies and the new Burst Background Stamp. 


I colored my giraffe with Copic markers and trimmed him down.  I die cut the FaDoodles Frame Scalloped Rectangles from aqua colored card stock and die cut a Pierced Stitched Circle from the center.   I inked some Tumbled Glass onto a piece of white card stock and placed it behind the FaDoodles Frame.  


I created a peachy card base and stamped it with peach ink using the Burst Background stamp.   Then I layered the frame and circle onto the panel and added the giraffe.   I stamped a sentiment from the stamp set and then die cut it with the pierced oval sentiment using the Quick Strips die.  


Thanks so much for stopping by!   Be sure to go to the Whimsy Stamps page and check out all the new products for the June release!   Here is some more inspiration from the design team:


Check out the new mini release today!   There are so many fun new products!!!!   Check out what the design team has created to inspire you!!!

See you soon!

↠↠↠💗↞↞↞
Tricia 


Supplies I used today!

Pierced and Stitched Circles Die Set - Whimsy StampsQuick Strips Die Set - Whimsy Stamps

Thursday, June 25, 2020

Whimsy Stamps - Dragon Water Fun

Hey there!!!   I am here to share another mini release with Whimsy Stamps!   I am in love with this stamp and die set today!    The new stamp set is called Dragon Water Fun!  Is this not the cutest stamp!!!   I love dragons and this one just makes me smile.   I stamped the image and cut it out with my Scan and Cut.   I colored it with my Copic markers.   I love these colors and love the bright and bold of the orange, yellow and blue! 


For the background, I die cut a panel using the new FaDoodles Frames Scalloped Rectangles die.  I ink blended with Distress Oxide inks in Tumbled Glass, Peacock Feathers and Chipped Sapphire.  I repeatedly stamped the rain drops over the panel once it was dry and white heat embossed it. 


I layered the stamped and ink panel onto an A2 kraft card base that had been stamped with the Buffalo Plaid Background Rubber stamp set with kraft ink.   Just a subtle hint of texture on the card base. 


 I love the sentiment You Got This in the stamp set!   I stamped it directly onto the panel with black ink.   

Check out the new mini release today!   There are so many fun new products!!!!   Check out what the design team has created to inspire you!!! 


Thank you for stopping by!  

↠↠↠💗↞↞↞
Tricia 

Supplies I used today!

Buffalo Plaid Background Rubber Cling Stamp - Whimsy Stamps


Tuesday, June 23, 2020

Reverse Confetti - Clean and Simple!

I am over on the Reverse Confetti Blog today sharing a clean and simple project - head over there and find out more about it!   


↠↠↠💗↞↞↞
Tricia

Club La-La Land Crafts - Second Look at the June Club Kit

Hello!  I am back to share a second look at the Club La-La Land Crafts June Kit.   You still have time to order this month's kit, see details at the bottom of my post for more information.  


I created an extra large Slimline design card with the Reading on the Beach Marci.   I started by die cutting the Sand Castle four times from kraft cardstock.   I added details with inking the edges, adding some dot details with a brown marker, white gel pen and sparkle gen pen.   I then trimmed down each of the end castle turret and then layered the trimmed die cut on top of a full sand castle with foam tape.   


My card base was created from kraft cardstock.   I layered on top of the card base two Large Stitched Tags that had been die cut and stamped with the Happy Heart Background Stamp set with kraft ink.   I laid them top to top in the center and then covered it with an ink blended Pierced Scalloped Circle die cut.   I used Tumbled Glass, Peacock Feathers and Chipped Sapphire Distress Oxide inks.  I white heat embossed a sentiment from Reading on the Beach Marci.  


I die cut the Pail and Shovel and Beach Ball from different colors of cardstock and added them on either side of Marci. Marci and her beach towel were colored with Copic markers and then trimmed down.  I used a white gel pen to add details to the towel.  Here is a full list of the Copic Markers that I used: 

Hair E50, E51, E42, E55
Skin E000, E00, E11, E21, R00, R20, R81, R83
Bathing Suit R24, R27, R29
Book E40, E41, R32
Towel YG01, YG03, YG17


Next up, I created a large tag and plan to use this when my niece comes to visit with a basket of pool toys.   I thought this would be a super cute addition to the basket and she will love it! 

I die cut three of the Large Stitched Tags - two from white cardstock and one from navy blue.   I trimmed the navy blue every 1/2 inch and then pieced back together on top of the white tag.  I adhered every other piece to create strips across the tag.  Navy and white is so classic for summer!  I adhered the two white Large Stitched Tags together to make it really sturdy.   I added a glitter reinforcer using a die from the Large Stitched Tags die.  


I colored two of the pigs from The Beach is Calling and colored with my Copic markers.  I added some details to the images with a Sharpie extra fine point paint pen.  Here are the Copic markers that I used: 

Pigs YR000, YR00, E21, R20, R00
Chair E30, E31, R24, R27
Glass Y11, Y13, Y18, BG000, BG53
Snorkel Y11, Y13, Y18, BG53, B45
Bathing Suit and Inner tube R24, R27, R29, Y11, Y13, Y18


I die cut the Beach Ball, Pail and Shovel from aqua, red, white and yellow cardstock and then adhered the images together.   They were added to the bottom left of the tag and I added a red crystal jewel to the shovel to get a little sparkle.  For the sentiment from The Beach is Calling, I stamped a sentiment onto a Stitched Nested Circle die cut and layered this on top of a die cut Pierced Scalloped Circle.   I finished it off with some red and white twine.     


Make sure that you check out all the inspiration for the June kit on the  La-La Land Crafts Blog.  You can also find great inspiration over at the Club La-La Land Crafts Facebook Group and on Instagram as well. 

Here are the details if you would like to order the June Kit!   

This month's kit comes with two stamp sets: 
The Beach is Calling
Reading on the Beach Marci

Along with three dies: 
Sand Castle Die 
Pail and Shovel Die 
Beach Ball Die 

Club La-La Land Crafts is a MONTHLY Subscription for the EXCLUSIVE KITS from La-La Land Crafts!   Each month you will receive a package with a kit based on your choice of subscription plan - Stamps and Dies, Stamps Only or Dies Only. 

Project Tutorials are included every month from the Design Team.  You will receive a link to download pdf documents with step-by-step project instructions to make projects designed for you by the Club La-La Land Crafts Design Team!  **Link HERE to the Club La-La Land Subscription page**


The full value of this kit is $77.97
with the Stamps only is $24.00
with the Dies only is $52.97

Thru the Club La-La Land Subscription you pay: 

Product Kit - Stamps and Dies - $39.99
Stamp Kit - Stamps Only - $19.99
Dies Kit - Dies Only - $29.99

The last day to subscribe for this kit is June 30th! 


Thank you so much for stopping by today! 


↠↠↠💗↞↞↞
Tricia 


Saturday, June 20, 2020

Whimsy Stamps - Fairy Llamacorn Magic

Happy Friyay!  And what can make a Friday even more special - when you get a special wish from a Fairy Llamacorn!!!!  😆😆😆


I started off by stamping the Fairy Llamacorn Magic image and colored with my Copic markers.   I added some details with my crystal sparkle pen and white gel pen.   I cut the image out with my Scan and Cut.   


I stamped the new Burst Background stamp onto a panel of white cardstock and white heat embossed the image.  I used Spun Sugar and Picked Raspberry Distress Oxide inks over the panel.   I used a paper towel to buff off the ink from the white heat embossed panel.   


I stamped a sentiment from the Fairy Llamacorn Magic stamp set onto a die cut Speech Bubble.   I added the Fairy Llamacorn to the panel with some foam tape.   I trimmed the inked panel down and then layered it on top of hot pink cardstock and added to an A2 panel.   

↠↠↠💗↞↞↞
Tricia 


Friday, June 19, 2020

Reverse Confetti - Inspiration Station!

Hey everyone!  Have you signed up for the Reverse Confetti Newsletter?   We share projects only available to newsletter subscribers!    To sign up,  to to the Reverse Confetti Blog here and go to the bottom of the page and enter your email address!    

Here is a little peek at my project!


↠↠↠💗↞↞↞
Tricia 

Thursday, June 18, 2020

Whimsy Stamps - Cool Beans

Hello there!!!  I am popping in to share a card using the Whimsy Stamps Cool Beans stamp set.   I was inspired by this photo (thanks Amy T!) and made this card but did not have a chance to share it, so I am sharing it today.  I loved the colors in the photo and recreated them with several Whimsy Stamps dies - I used the Pierced and Stitched Circles Die set and used several different sizes of circles and die cut a few for the panel and for my Cool Beans stamped images.   


I also used the No See All Seasons Tree Die Set and die cut several of the flowers from different colors to match the inspiration photo.   I layered the flowers and the circles onto an aqua panel that had been die cut with the Zig Zag Stitched Rectangle. 


 I stamped the Cool Beans images onto a white die cut circle and colored with my Copic markers.   I added details in with my white gel pen.   I layered the stamped circle onto another aqua circle and popped this up onto the card panel with foam tape.  


To finish it off, I added several smatterings of clear crystal sequins onto the card.    

Thanks for stopping by today!   I hope you have a wonderful day!   

↠↠↠💗↞↞↞
Tricia 


Wednesday, June 17, 2020

SugarPea Designs - Mix It Up Challenge - Cool Treats

I am playing along today to this month's Mix It Up Challenge at SugarPea Designs Blog!   

I have a cool card to share with you today using the Cool Treats stamp set.   When I saw this month's challenge, I thought of this stamp set - doesn't the inspiration photo make your mouth water!   I just love the colors in the challenge so I went with a mixture of the photo and colors for my card this month.   


I stamped my panel with the two ice cream images in the Cool Treats stamp set all over the background with yellow ink.   I then die the panel with the stitched die from the Card Front Element Builder SugarCut.   I die cut some aqua stars using the Stacked Stars SugarCut. 


I stamped my image from Cool Treats and colored with my Copic markers.   I die cut it out with the matching Cool Treats SugarCut.  I added some details to his inner tube with my white Sharpie paint pen.   


I stamped a sentiment onto black cardstock and then white heat embossed the sentiment and trimmed it down.   I die cut a small white circle using the Card Front Element Builder II SugarCut and this is where I placed my penguin and sentiment - these were both popped up with foam tape.  


I finished off my card with some yellow crystal jewels.   You have till June 30th to play along!  
Thank you for stopping by!