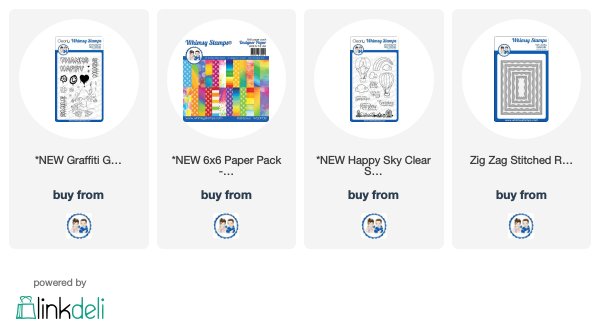
Happy Day to you! I am sharing one of my favorite stamp sets from Whimsy Stamps February Release - Happy Sky!
I stamped the images onto Neenah cardstock and then colored with my Copic markers and die cut them out with the Happy Sky die set. I die cut out a white panel with the Zig Zag Stitched Rectangles and stamped the sentiment from Happy Sky with aqua ink and the landscape image onto the bottom of the panel with black ink.
For my main panel, I stamped the Marble Background stamp with aqua ink onto aqua cardstock. I then die cut the panel with the Zig Zag Stitched Rectangles die set. I layered this onto a black panel onto a card base.
I added my images with foam tape. I added some crystal sequins for a final detail!
Have you checked out the February release from Whimsy Stamps? Check out the full release here!
Thank you for stopping by! I hope you have a wonderful day!
Hey there! It's time for a new Mix It Up Challenge at SugarPea Designs. I was so inspired this month, I created two cards! You have all month to play along and the more times you play along during the month using SugarPea Designs product, the better chance you have of winning a $50 gift certificate to our store!
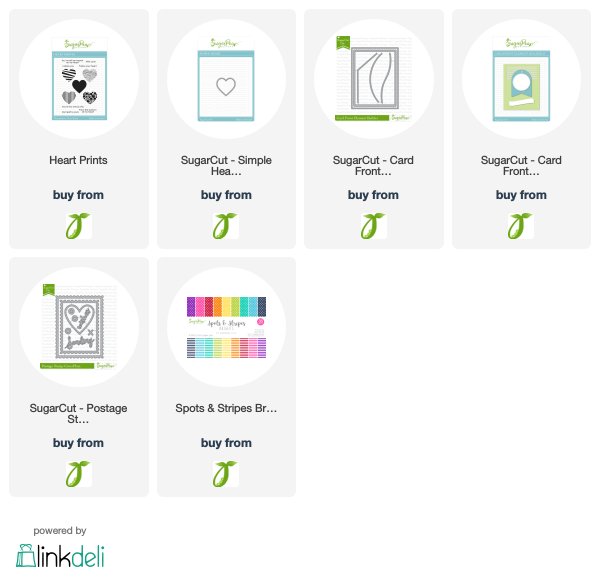
Here is my first card, I used Heart Prints and created this super quick and easy card that can be used for anniversary or anytime you want to share some love!
I used the Spots and Stripes Brights paper pad that is currently on a great sale right now!!!! I add a white panel die cut with the Postage Stamp SugarCuts. The sentiment is stamped from Heart Prints onto a sentiment banner from Card Front Element Builder II.
One of my favorite hearts in the Heart Prints is the thumbprint heart! I just love it. I stamped it out in pink ink and paired it with a die cut with the Simple Heart SugarCut. The Heart Prints and Simple Heart SugarCut makes such easy quick and simple card designs!
I just love the bright pink. I was inspired by this month's challenge photo and all the yummy cookie hearts on a platter!
The card was so quick that I decided to make another one! This time I went a little bolder and instead of the pink I went with bright red. Instead of one stamped heart, I stamped three of the patterns from Heart Prints with bright red ink and paired it with a Simple Heart SugarCut.
Instead of the Postage Stamp SugarCut I used the Scalloped die cut from the Card Front Element Builder from bright red cardstock.
I placed the hearts into a symmetrical pattern and added the same sentiment strip from Card Front Element Builder with another sentiment stamped from Heart Prints stamp set.
Again, super simple, quick and easy!
See the details below for the challenge rules and opportunity for a prize! You can use the sketch or the inspiration photo or sketch! Either one or both!
Here is the link to the SugarPea Designs Blogand on the right side bar you can get to the current challenge!
Hey there! Hope you are having a wonderful day! I am here today sharing a card using a new stamp set called Graffiti Girl! She is super adorable! I can imagine that she is very sassy and is a crafter at heart!
I stamped her out onto Neenah cardstock and then stamped her again on some masking tape. I trimmed out the image and then placed on top of the stamped image. I then used the Brick Pattern Stencil with some grey ink heavier in the center and then lighter as I got further out. I then stamped the drippy smiley face with red ink.
I then colored the image with my Copic markers and added some details with my white gel pen. I
stamped a sentiment from Happy Sky. I stamped a few of the accessories stamps from Graffiti Girl onto the panel. I die cut out the panel with the Zig Zag Stitched Rectangles Die Set.
I layered this panel onto a piece of patterned paper from the very popular Rainbow paper pack. I just love this image and love her little look - she is rocking her tennis shoes along with the pretty ribbon! I had so much fun coloring this little Graffiti Girl!
Hello! I am Guest Designing this month with Club La-La Land Craft February 2020 Kit! This kit is just adorable! I have been a busy bee creating two projects today to showcase this new kit.
My first card is just buzzing with the cutest little bees. Just Bee-cause stamp set has three cute bees along with five sentiments. The stamps are made from high quality red rubber and come with the foam backing. I stamped the images out and colored with my Copic markers, which are listed below.
To create my card panel, I die cut with the new Double Stitch Hexagons die set 10 yellow hexagons using the second largest die. I started in the center of the panel and adhered the yellow hexagons in a pattern onto a white card panel. I then die cut from the new Love You More paper pack some patterned paper using the second smallest hexagon and layered this onto the yellow hexagons.
For my sentiment, I die cut a white hexagon and stamped it with a sentiment from the Just Bee-cause stamp set and layered over the centered yellow hexagon with foam tape. I then layered all the little bees around the sentiment with foam tape. I finished the card off with some yellow crystal jewels.
Copic Colors:
Bees: Y11, Y13, Y15, R20, W4, W5, W6
Wings: BG0000, BG000, BG10, 0
Bucket: E30, E33, E35
Queen Crown: YR24, YR21, Y21
For my next card, I used the new Bee Happy Marci.
I used the new Hello Life paper pack and used several pieces of the patterned paper to create my card panel. I also used the new Happy Heart Background stamp set from the February Release and stamped it with pink ink onto some pink cardstock and die cut the stamped panel with the largest hexagon die from the new Double Stitched Hexagon dies.
I added a Scalloped Rectangles on the left side of the hexagon and trimmed off the excess. I then die cut several small hexagon's from grey card stock and scattered them across the panel. She was fussy cut out and then added to the panel with foam tape. I stamped a sentiment onto a stitched flag from the Stitched Elements die set.
Marci was stamped and colored with my Copic markers:
Here are the details if you would like to order the February Kit!
Club La-La Land Crafts is a MONTHLY Subscription for the EXCLUSIVE KITS from La-La Land Crafts! Each month you will receive a package with a kit based on your choice of subscription plan - Stamps and Dies, Stamps Only or Dies Only.
Project Tutorials are included every month from the Design Team. You will receive a link to download pdf documents with step-by-step project instructions to make projects designed for you by the Club La-La Land Crafts Design Team! **Link HERE to the Club La-La Land Subscription page**
The full value of this kit is $80.99
with the Stamps only is $20.99
with the Dies only is $56.99
Thru the Club La-La Land Subscription you pay:
Product Kit - Stamps and Dies - $39.99
Stamp Kit - Stamps Only - $19.99
Dies Kit - Dies Only - $29.99
The last day to subscribe for this kit is February 20th!
Check out this Youtube Video for a closer look at the kit!
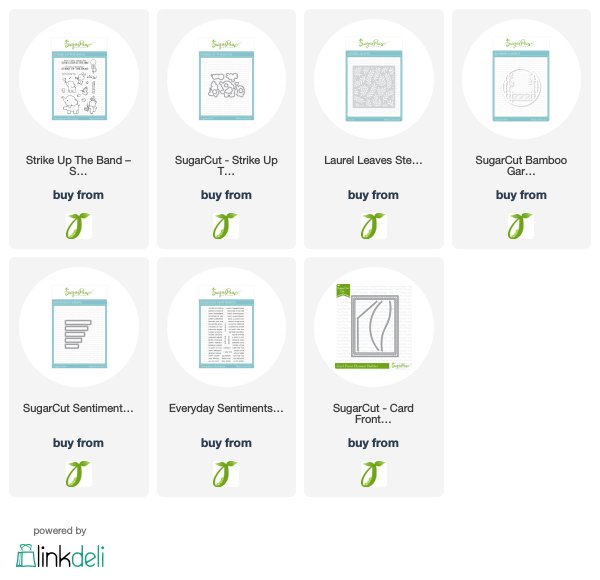
Hey there! It's Tricia here today to share a Spring birthday card using Strike Up the Band. As I was making this card, it was snowing at my house! I live in Atlanta, it was a little unexpected since we had almost seventy degrees the week before. The warm weather has me ready for Spring.
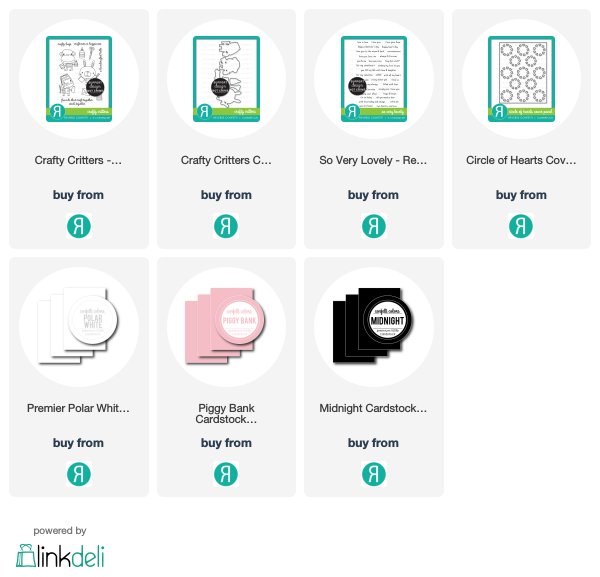
It's time again for the Reverse Confetti Blog Hop! For our hop today we are all sharing cards made with cute critters!!!! I used the new Crafty Critters. I just love this set and can't stop using it! You should have hopped to me from Amy Kolling's blog. To see the full list for the blog hop, check out the list at the end of my post!
I stamped two of the critters and then a whole bunch of the accessories. This will be a Valentine's Day card for someone special! I stamped my images onto Premier Polar White cardstock and then die cut out with the Crafty Critters Confetti Cuts. I colored all my images with Copic Markers.
For my card panel, I used the Circle of Hearts Cover Panel and die cut it from Premier Polar White and then backed it with some Piggy Bank cardstock. I then added this to a white card base.
I stamped a sentiment from So Very Lovely stamp set and white embossed the sentiment onto a strip of Midnight card stock. I made the strip 5 1/2 inches long to cover the entire panel. I then added it with some foam tape.
I layered all my images over the sentiment. I added some details with my white gel pen and some crystal glaze over the hearts.
I cannot wait to hop around to see all the cute critters! So much inspiration with some of my favorite type of stamp sets! Have fun hopping! Next up is Lisa Henke's blog.
Happy Day! I have this super cute Beaver Birthday card to share with you today using the most recent February release! I love the little buck teeth of the beavers - 😆
I stamped the images from Beaver Birthday onto Neenah 80lb card stock and then colored with my Copic markers. I layered the images onto a new die cut that is called Connected Rectangle Frame die. I die cut from white and pink card stock and then inlayed the largest white panel back into the frame.
My background was created with the Marble Background Rubber Cling Stamp, I really love this background! I stamped onto some peach card stock with some darker peach colored ink.
The sentiment is from the Beaver Birthday stamp set and was white heat embossed onto black card stock. The white embossed sentiment and peach background were both die cut with the Zig Zag Stitched Rectangle die set.
Take a look at the Whimsy February release! You can find all the new release products here.
Here are the links to the supplies I used today from Whimsy - affiliate links used at no extra charge to you!
First up, I used the sweet Marcy with Pen stamp and colored her with my Copic Markers. I created a background for Marcy by using the Ink with Pen die and die cut it multiple times from white cardstock. I then adhered them to a white panel in a repeated panel. After I glued the Ink with Pen down to the white card panel, then I trimmed it with my paper cutter and layered onto a peach panel.
For Marcy with Pen, I colored her with my Copics and gave her some details with a white gel pen. Hair is still a challenge for me. I have not perfected coloring hair but this image is easy to color!
For the sentiment, I stamped a sentiment onto a stitched flag banner that had been die cut with the Stitched Elements die from peach, dark peach and aqua cardstocks and then layered them for a thicker banner element.
Copics: Face E000, E01, E02, E11, R20, R83 Hair E21, E25, E27 Jeans B91, B95, B97 Boots E11, E13, E17 Top BG0000, BG000, BG01, YR01, YR02, YR04 Vest & Headband YR000, YR00, YR01, YR02 Pad C01, C00, 0
For my next card, I used the Happy Mail stamp set and colored one of the pigs with my Copic markers. I then did a ton of die cutting. I die cut two circles one from white and one from turquoise cardstock using the Double Stitched Circles die. I then die cut the Mail Box die from red and pink cardstock. I die cut several Envelopes border dies and colored the hearts with my Copic markers. I did a double layer of the Envelopes border.
I stamped a sentiment from Marcy with Pen and used the talk bubble from Stitched Elements die. I added some details with my white gel pen and clear sparkle pen.
Copics: Pig R00, R01, R02 Vest & Bow R24, R27, R29 Pen & Paper E35, E40
Be sure to check out the Club La-La Land Craft kits - here.
Club La-La Land Crafts is a MONTHLY SUBSCRIPTION for the EXCLUSIVE KITS from La-La Land Crafts! Each month you will receive a package with a kit based on your choice of subscription plan – Stamps and Dies, Stamps Only or Dies Only.
Project TUTORIALS are included every month. You will receive a link to download pdf documents with the step-by-step project instructions to make projects designed for you by the Club La-La Land Crafts Design Team!***Link Here to the Club La-La Land Subscription***