Tuesday, November 10, 2020

Whimsy Stamps - Dragon New Year

 Hey there!  Whimsy Stamps has a mini release for November and I am sharing this shaker card made with several new items!   

New items used: Dragon New Year stamp set, Alphabet Mini stamp set and the Extreme Postage die set. 

I started my card by stamping the dragon from Dragon New Year and colored with my Copic markers.  I trimmed it down and added some details with a white gel pen.   The sentiment is stamped out with the new Alphabet Mini stamp set.   With this stamp set, you can customize your sentiments.   I decided to go with Party Hardy!  It was really easy to do, I used some postage tape and taped off a line on my MISTI panel.  Then I added each letter to the MISTI and they are in a block style format.  This allowed me to line them up really easily with the postage tape line.   


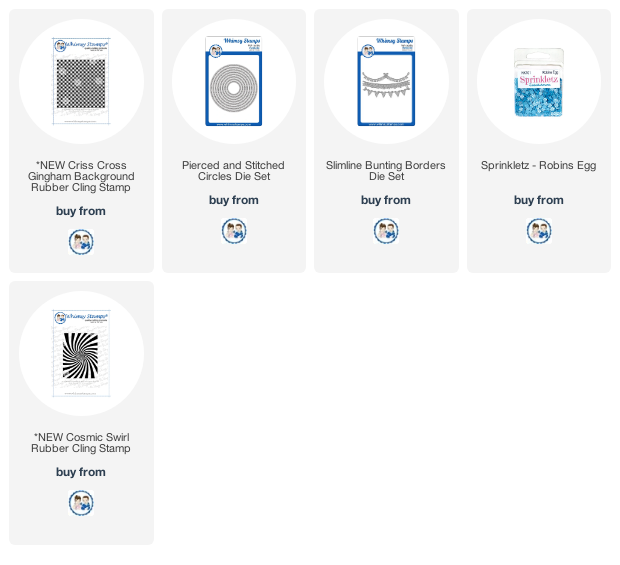
For my shaker, I die cut a panel of aqua cardstock with the Extreme Postage die.  I then stamped the panel with the Criss Cross Gingham Background Stamp with aqua ink.  I die cut a circle from the center using the Pierced Stitched Circles die.   On my card base, I stamped with the Comic Swirl stamp and light grey ink.  I then added some Robins Egg Sprinkletz along with some aqua sequins to the shaker.  


I then finished off the card with a banner using the Slimline Bunting Border Dies.   I love those dragon images from Dustin Pike!   Check out what the design team has created below for the mini release today! 


Supplies used: 


Sunday, November 8, 2020

Reverse Confetti November Blog Hop

 It's release day!  All the November release items are available now!    There is a big hop today to celebrate!   I am also using some Thermoweb products today!   I used Flock Transfer Sheets and Deco Foil to create my card along with the new Away in the Manager Confetti Cuts.   


I started by creating my card base using the Pointed Cover Panel and Mist cardstock and die cut my card panel.   I layered on top of this a strip of the Flock Transfer sheet that I embossed with the Snowballs Cover Panel.  I trimmed it down and layered this on top of a kraft card panel.   


I die cut Deco Foil Foam Adhesive with the manger and the star from the Away in the Manger Confetti Cuts.   I then layered the manger with the Tuscon Gold Flock Transfer and ran it through my die cutting machine.  I did the same thing for the gold star and used the Deco Foil.   


I stamped a sentiment from Joyful Holiday Wishes and white heat embossed it.   I added it to the panel with some foam tape!   

Be sure to hop along to all the designers today to see much more inspiration with the November release!   


Amy Kolling

Ali Farmer

Tricia Barber

Lisa Henke

Joan Bardee

Kathy Schweinfurth

Olga Moss

Jeanne Jachna

Deanne Kuntz

Maria Willis

Cheiron Brandon

Amy Tsuruta

Cindy Norberg


Saturday, November 7, 2020

Countdown to Confetti - Day Three

Welcome back to day three of the Countdown to Confetti November release!   I have more cute projects to share with you today using the new Deerly and Yuletide Mice stamp sets along with several of the new Confetti Cuts.   


I started out making these cute Christmas tags using the new Deerly stamp set along with the new Starstruck Cover Panel.   I stamped the images from Deerly out and then colored with my Copic markers.   I added some details with my gel pen and crystal glaze.   I die cut the images out with the matching Deerly Confetti Cuts.   


The tags were made with the new Starstruck Cover Panel.   I first die cut some Iced Aqua and Navy cardstocks using the Pierced Round Top Layers Confetti Cuts and then ran them back through my die cut machine with the Starstruck Cover Panel to create my tag.   


I then stamped a sentiment from the Deerly stamp set onto a sentiment banner from Flowers for Mom Confetti Cuts and added some Holly Confetti Cuts to the top of each tag.   The Holly was cut from Lime Green, Salsa and Premier Polar White cardstock.    These are going to look so cute on top of a present!   


Next up are these cute adorable mice from the Yuletide Mice stamp set!   They are so adorable!   I stamped them out onto Premier Polar White cardstock and then colored with my Copics.   I die cut each of them out with the matching Yuletide Mice Confetti Cuts.   I added some details with my white gel pen!   


The sentiment is from the Yuletide Mice stamp set and I layered sentiments on top of one another onto a little panel of Midnight cardstock.   Now for the card panel - I just LOVE the new Plaid Lines - Big and Plaid Lines - Small Cover Panels!!!  I die cut the panels from Lime Green and Salsa cardstock.   I layered them onto an Avocado card base.   I did not want to cover these beautiful panels up so I just layered my images on the card panel.  


Reverse Confetti is giving away a $15 gift certificate to one blog commenter and also to one Facebook commenter.   Here is a link for the Reverse Confetti Facebook page.   Please leave a comment on each sneak peak post for each designer, below is a link list for each one!  

 Comments will close at noon CST on the 7th and the winner will be announced at 5pm CST on November 7th on the Reverse Confetti Blog and Facebook page!  Please check out the Reverse Confetti Blog for all the details on the giveaways!!  

Well that is it for me today!  You need to check out what the design team has in store for you today!  Hop along and make sure to comment! 


Friday, November 6, 2020

Countdown to Confetti - Day Two

Hello!  Welcome back to Day Two of the Countdown to the Confetti November Release!  I am sharing with you this beautiful new scripted stamp set called The Best Gift of All along with two new dies Away in the Manger and Starstruck Cover Panel.   


I started by ink blending with Abyss, Wisteria and Baby Blue Reverse Confetti die inks.   I die cut the panel with the new Starstruck Cover Panel.  I ink blended again onto the card base with Bumblebee ink and then covered the ink with some Moonstone Glimmer Paste.   


I die cut the Away in the Manger Confetti Cuts and ink blended the edges of the manger with some Sand ink.   I stamped the sentiment from The Best Gift of All right above the mager and then layered my star above it.  


Reverse Confetti is giving away a $15 gift certificate to one blog commenter and also to one Facebook commenter.   Here is a link for the Reverse Confetti Facebook page.   Please leave a comment on each sneak peak post for each designer, below is a link list for each one!  


 Comments will close at noon CST on the 7th and the winner will be announced at 5pm CST on November 7th on the Reverse Confetti Blog and Facebook page!  Please check out the Reverse Confetti Blog for all the details on the giveaways!!  

Well that is it for me today!  You need to check out what the design team has in store for you today!  Check it out below! 

Thursday, November 5, 2020

Countdown to Confetti - Day One

 Welcome to the first day of the Countdown to Confetti for the November release with Reverse Confetti!   With this release there are 6 new stamp sets and 8 new Confetti Cuts die sets!  Today, we are sharing 3 of the new stamp sets: Botanical, Home for the Holidays and Mixed Messages.  


I created this card with the new Home for the Holidays.   This stamp will pair well with many of the holiday stamp sets from Reverse Confetti.   I started by ink blending with Iced Aqua, Lagoon and Island Blue inks.   I then stamped my images onto Premier Polar White cardstock and colored with my Copic markers.  I die cut the images with the matching Home for the Holidays Confetti Cuts.   


I then splattered my images with some white paint and set them aside to dry to add the effect of snow.   For the sentiment, I used Joyful Holiday Wishes that had been previously released.   I added the images to the slimline card with some foam tape and added some crystal jewels to finish it off.   


Next up, I used the new Botanicals and Mixed Messages stamp set along with two new dies that pair so well together Plaid Lines - Big and Plaid Lines - Small.   These can be layered together or used individually.  


I stamped the vase and flowers from Botanicals onto Premier Polar White cardstock and colored with my Copic markers.   I die cut them out with the Botanicals Confetti Cuts.  


For the card base, I die cut the Plaid Lines - Large from white cardstock and the Plaid Lines - Small from Kraft cardstock and layered on top of a Mist card base.   I love the look of the plaid and all of the dimension that it adds!   There are so many possibilities with these dies.   


The sentiment is from Mixed Messages.   I love the scripty font along with the smaller text.   I die cut the sentiment out with the Three Tags Confetti Cuts.   I added some twine and adhered to the top of the card with foam tape.   

Reverse Confetti is giving away a $15 gift certificate to one blog commenter and also to one Facebook commenter.   Here is a link for the Reverse Confetti Facebook page.   Please leave a comment on each sneak peak post for each designer, below is a link list for each one!  


 Comments will close at noon CST on the 7th and the winner will be announced at 5pm CST on November 7th on the Reverse Confetti Blog and Facebook page!  Please check out the Reverse Confetti Blog for all the details on the giveaways!!  

Well that is it for me today!  You need to check out what the design team has in store for you today!  Check it out below! 

Amy Kolling

Tricia Barber

Lisa Henke

Joan Bardee

Kathy Schweinfurth

Jeanne Jachna

Deanne Kuntz

Maria Willis

 Cheiron Brandon

Amy Tsuruta

Cindy Norberg


Monday, November 2, 2020

Whimsy Stamps - Elegant Ornaments

Hey there!  I am here to share with you some gorgeous new products from the Whimsy Stamps mini release.  I made these two cards using the new Elegant Ornaments along with the new Blurry Flurries paper pack.   

The new Blurry Flurries paper pack is so pretty!   Just gorgeous!   I covered an A2 card base with some of the patterned paper.   


I stamped the images from Elegant Ornaments onto colored cardstock and then silver embossed the images.  I die cut them out with the Elegant Ornament die.   


I stamped my sentiments and silver embossed them as well.  To finish off the cards, I added some Sprinkletz in Icicles.  


Be sure to check out more of the new mini release over at Whimsy Stamps!  


Sunday, November 1, 2020

Whimsy Stamps - Slimline Scenic Countryside die

 Good morning!   There is a new release at Whimsy Stamps today!   This wonderful new Slimline Scenic Countryside die will be your go to die for building all kinds of wonderful scenes.   


I started off by using some Distress Oxides Inks in Spun Sugar, Worn Lipstick and Picked Raspberry and covered a slimline panel.   I then die cut all my images with the Slimline Scenic Countryside die


I colored the die cuts with my Copic markers.   I then splattered the whole panel with watered down white acrylic paint.   Once they were dry, I started building my scene.   I love the frame that the die provides!   It frames the scene out perfectly!   


Hop over to the Whimsy Stamps Blog to see what else is released with today's mini release!  Here is a sneak peek below at some of the design team projects!